How to Create Custom Form in Magento 2

In today’s competitive eCommerce landscape, collecting customer information is not just optional—it’s essential. Whether it’s feedback, product inquiries, wholesale registrations, or event sign-ups, custom forms help merchants gather valuable data to improve personalization, boost conversions, and strengthen customer relationships.

However, Magento 2’s default options for forms are limited, offering only basic “Contact Us” functionality. For anything beyond that, store owners either need to hire a developer to build forms programmatically (time-consuming and costly) or use a flexible extension that simplifies the process

That’s where the Magento 2 Custom Form Builder Extension comes in. It allows you to create unlimited forms with drag-and-drop ease—no coding required. In this tutorial, we’ll guide you step-by-step on how to install, configure, and get the most out of the extension. We’ll also compare it with the manual (programmatic) method and highlight best practices.

According to the Baymard Institute, 18% of U.S. online shoppers recently abandoned their cart due to a ‘too long or complicated checkout process’. By optimizing your forms, you not only collect the right data but also improve user experience and reduce drop-offs.

Key Takeaways

  • Custom forms are essential in eCommerce for collecting customer data, feedback, and inquiries efficiently.

  • Magento 2’s default form options are limited, but a custom form builder extension offers flexibility and control.

  • The Magento 2 Custom Form Builder Extension allows store owners to create contact, survey, feedback, registration, and more forms without coding.

  • Features like drag-and-drop form creation, conditional logic, file uploads, and captcha make it easy to design professional, secure forms.

  • Well-designed forms help improve customer experience, increase engagement, and streamline communication.

Why Do You Need Custom Forms in Magento 2?

Here are some common scenarios where Magento merchants benefit from custom forms:

  • Contact Us Form – Beyond the default, you may want conditional fields (e.g., “General Inquiry,” “Technical Support”).

  • Product Inquiry Form – Allow customers to ask questions directly from the product page.

  • Feedback / Review Form – Collect post-purchase feedback to enhance your service.

  • Wholesale Registration Form – Gather details from potential B2B partners.

  • Event Registration Form – Useful for webinars, launches, or offline events.

  • Gift Customization Request – Enable buyers to personalize products.

While it’s possible to build these programmatically, using an extension like MageDelight’s Magento 2 Custom Form Builder saves significant time and effort.

Also read: How to Customize Contact Us Form in Magento 2?

Two Ways to Create a Custom Form in Magento 2

Here are the 2 way to create custom form in Magento 2.

Method 1. Programmatic Method (For Developers)

If you prefer the manual approach, Magento 2 allows you to build custom forms using modules, UI components, and PHP files. Here’s a simple example of a contact form block (Form.php):

Step 1. Update code in file Form.php at app\code\Meetanshi\Extension\Block

<?php

namespace Magedelight\Extension\Block;

use Magento\Framework\View\Element\Template;
use Magento\Backend\Block\Template\Context;

class Form extends Template
{
    public function __construct(Context $context, array $data = [])
    {
        parent::__construct($context, $data);
    }

    public function getFormAction()
    {
        return $this->getUrl('extension/index/submit', ['_secure' => true]);
    }
}

Step 2. Update code in file form.phtml at app\code\Meetanshi\Extension\view\frontend\templates

<div class="row">
    <div class="col-md-8">
        <form name="addData" method="post" id="addData" class="form"
              action="<?php echo $this->getFormAction(); ?>"
              data-hasrequired="<?= $block->escapeHtmlAttr(__('* Required Fields')) ?>"
              data-mage-init='{"validation":{}}'>
            <fieldset class="fieldset">
                <legend class="legend"><span><?= $block->escapeHtmlAttr(__('Fill Detail')) ?></span></legend>
                <fieldset class="fieldset row">
                    <div class="fields col-md-6">
                        <div class="field name required">
                            <label class="label" for="title"><span><?= $block->
                                escapeHtmlAttr(__('Name')) ?></span></label>
                            <div class="control">
                                <input name="name" id="name" title="Name" value="" class="input-text" type="text"
                                       data-validate="{required:true, 'validate-alphanum-with-spaces':true}">
                            </div>
                        </div>
                        <div class="field name required">
                            <label class="label" for="title"><span><?= $block->
                                escapeHtmlAttr(__('Email')) ?></span></label>
                            <div class="control">
                                <input name="email" id="email" title="Email" value="" class="input-text" type="text"
                                       data-validate="{required:true, 'validate-email':true}">
                            </div>
                        </div>
                        <div class="field name required">
                            <label class="label" for="title"><span><?= $block->escapeHtmlAttr(__('Telephone')) ?></span></label>
                            <div class="control">
                                <input name="telephone" id="telephone" title="Telephone" value="" class="input-text"
                                       type="text" data-validate="{required:true}">
                            </div>
                        </div>
                    </div>
                </fieldset>
            </fieldset>
            <div class="actions-toolbar">
                <div class="primary">
                    <button type="submit" class="action submit primary" title="Save"><span><?= $block->
                        escapeHtmlAttr(__('Save')) ?></span></button>
                </div>
            </div>
        </form>
    </div>
</div>

This method offers flexibility but requires strong Magento 2 development knowledge.

Also read: How to Validate Forms in Magento 2?

Method 2. Using Magento 2 Custom Form Builder Extension (Recommended)

For non-technical merchants, the MageDelight Custom Form Builder Extension makes the process fast and user-friendly. Let’s walk through the installation and configuration.

Here are the steps to Install and Configure Custom Form Builder to Magento 2.

Step 1. Purchase and Install the Magento 2 Custom Form Builder Extension

Once you purchase the extension, for installation you need to unzip the extension package file into the root folder of your Magento 2 installation. Now, connect to the SSH console of your server:

  • Navigate to the root folder of your Magento 2 setup
  • Run command as per below sequence,
php bin/magento setup:upgrade
php bin/magento setup:di:compile
php bin/magento setup:static-content:deploy
php bin/magento cache:clean
  • log out from the backend and log in again!

Step 2. Configure the Magento 2 Custom Form Builder Extension

Now, let us check the configuration of the extension:

Custom Form Builder General Configuration


Enable Module - Enable/Disable the contact us form module for your store.

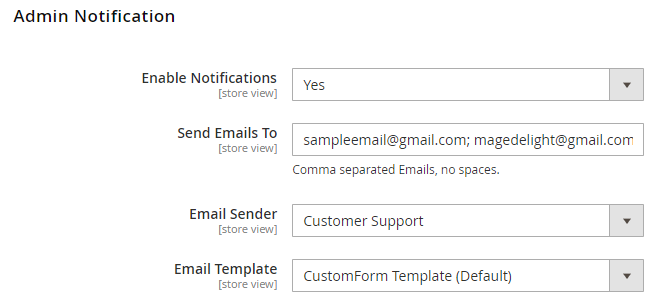
Admin Notifications Custom Form Builder


Enable Notifications - Select Yes/No to enable the email notifications

Send Emails to - Mention the email addresses separated by a comma to send a notification email to Admin

Email Sender - Set the email sender for admin notifications

Email Template - Set the email template as admin notification
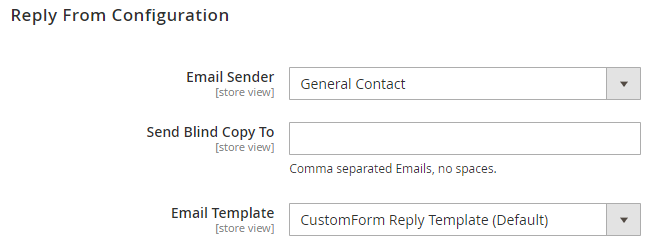
Reply Notifications

Email Sender - Configure the email sender to reply from.

Send Blind Copy to - Mention the comma-separated email address to send the blind copy

Email Template - Set the email template to be used to send a reply from the configuration
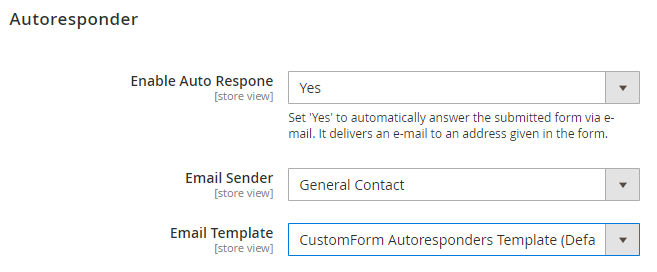
Auto Responder Configuration

Enable Auto Response - Enable/Disable the autoresponder to the form

Email Sender - Select the email sender from which the auto-response to be sent

Email Template - Set the email template to be used for auto-response
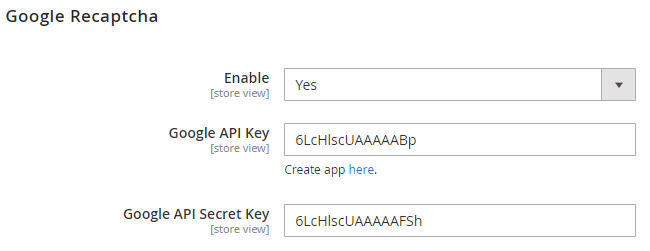
Google Captcha Configuration

MageDelight Custom Form Builder Magento 2 Extension comes with built-in Google Recaptcha to protect your store from fraudulent form submissions.

Enable - Enable/Disable Google Recaptcha

Google API Key - Mention the API keys provided by Google ReCaptcha (developer account)

Google API Secret Key - Mention the API secret keys provided by Google ReCaptcha (developer account)

And you're done.

Advanced Features of Magento 2 Custom Form Builder Extension

Beyond basic form creation, the extension offers:

  • Drag-and-drop form builder interface.

  • Support for multiple field types (text, dropdowns, checkboxes, file uploads).

  • Conditional logic (show/hide fields based on user input).

  • Multi-step forms for longer surveys.

  • Data export in CSV/Excel format.

  • Built-in validation rules (e.g., required fields, email format).

  • Prevention of duplicate submissions.

  • Compatibility with Google reCAPTCHA for added security.

Best Practices for Building Custom Forms in Magento 2

To maximize effectiveness:

  1. Keep forms short and relevant – Don’t ask for unnecessary details.

  2. Use validation – Prevent invalid entries to keep your database clean.

  3. Enable autoresponders – Customers expect instant confirmation.

  4. Add conditional logic – Simplify the user journey.

  5. Test on mobile – A large percentage of users will submit forms via smartphones.\

Real-World Example: Wholesale Registration Form

Imagine you run a B2B store. Instead of handling wholesale requests manually, you can create a custom form with:

  • Company Name

  • Contact Person

  • Email Address

  • VAT/Tax ID

  • Expected Order Volume

Conclusion: Simplify Form Creation with Magento 2 Custom Form Builder

While Magento 2 allows you to create forms programmatically, it’s often too complex for store owners who want quick results. The Magento 2 Custom Form Builder Extension provides a user-friendly alternative, enabling merchants to build advanced forms without touching code.

By using it, you can:

  • Save development time.

  • Improve customer experience.

  • Collect valuable data to grow your business.

If you’re ready to enhance your Magento 2 store with professional forms, explore the extension demos and try it yourself.

Also, you can refer this Magento 2 Custom Form Builder Extension’s FAQ Page for most common questions and it’s answers.

We hope we've helped you well with the configuration process. Still, if you are stuck anywhere while configuration, our experts will be happy to help. Reach us out!