


According to Coresight Research, sizing and fit problems are the single biggest driver of online apparel returns, accounting for 53% of returns across US brands and retailers. A follow-up Coresight and Alvanon report, published in May 2026, puts the share closer to 70% of all returns in the past 12 months. With the US online apparel and footwear market now at $201.1 billion, a 23.4% return rate means roughly $47 billion in merchandise coming back every year. Sizing confusion is not a fringe problem. It sits at the center of why fashion e-commerce bleeds margin.
Since size labels vary across brands, countries, and product categories, shoppers routinely order the wrong size and only discover the mismatch at the door. Magento 2 has no native size chart feature. The platform ships without any mechanism to display size guides on product pages. That gap must be filled by a third-party extension before customers can get the information they need to order correctly.
This guide walks through the complete setup process for adding size charts to your Magento 2 store using the MageDelight Size Chart Extension for Magento 2. It covers everything from initial configuration and button styling to display rules, per-product assignment, frontend verification, and ongoing best practices. All existing content from the original guide is preserved and expanded with the sections that were previously missing.
What is a Size Chart in Magento 2?
A size chart is a reference guide displayed on a product page that maps size labels (XS, S, M, L, XL, XXL) to specific body measurements such as chest circumference, waist, hips, inseam, and shoulder width. The purpose is simple: give shoppers enough information to match their own measurements to the correct size before placing an order.
In Magento 2, a size chart can be displayed in three ways depending on how you configure it. It can appear as a popup triggered by a button placed near the size selector on the product page. It can appear inline as a product tab alongside the description and reviews tabs. Or it can appear directly on the page as an embedded section. The right choice depends on how much space your product page layout has and how prominently you want the chart to appear.
Because Magento 2 does not include size chart functionality out of the box, the standard approach is to install a dedicated extension. The MageDelight Magento 2 Size Chart Extension provides a WYSIWYG editor for building charts, conditional display rules for assigning charts to specific categories or products, and full control over the button label, styling, and icon. The guide below uses this extension throughout.
Steps Process to Add Size Chart in Magento 2
Before going through the steps below, you need to purchase and install the MageDelight Magento 2 Size Chart Extension. Installation follows the standard Magento 2 extension process. Once the extension is installed and the cache is cleared, your admin panel will include the Size Chart menu items.
Step 1. Configure the Extension Settings
After installation, log in to your Magento 2 Admin Panel and navigate to:
Stores > Configuration > MageDelight > Size Chart Settings.
After that, expand the General Configuration section and do the following:
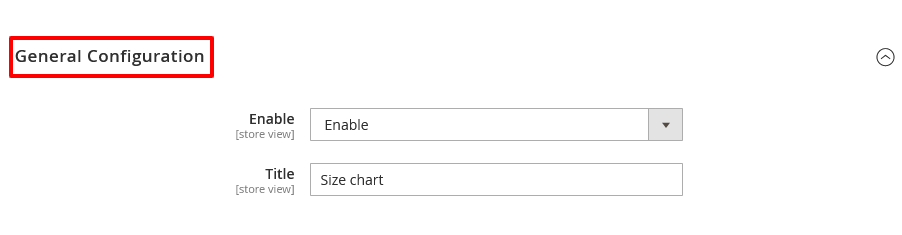
- Enable: Select "Enable" to activate the extension across your store.
- Title: Enter the label that will appear on the size chart button on product pages. "Size Chart" is the standard label, though you can customise this to "Size Guide" or "Fit Guide" depending on your brand language.
The extension also lets you customize the visual style of the size chart button. Under the button settings area, configure:
- Text Color: Sets the colour of the button label text.
- Background Color: Sets the button background colour.
- Border Color: Sets the border around the button.
- Icon: Upload a custom icon image to display alongside the button label. A ruler or measuring tape icon works well for apparel stores.
Click Save Config from the top-right corner once all fields are set.

Step 2. Manage and Add a New Size Chart
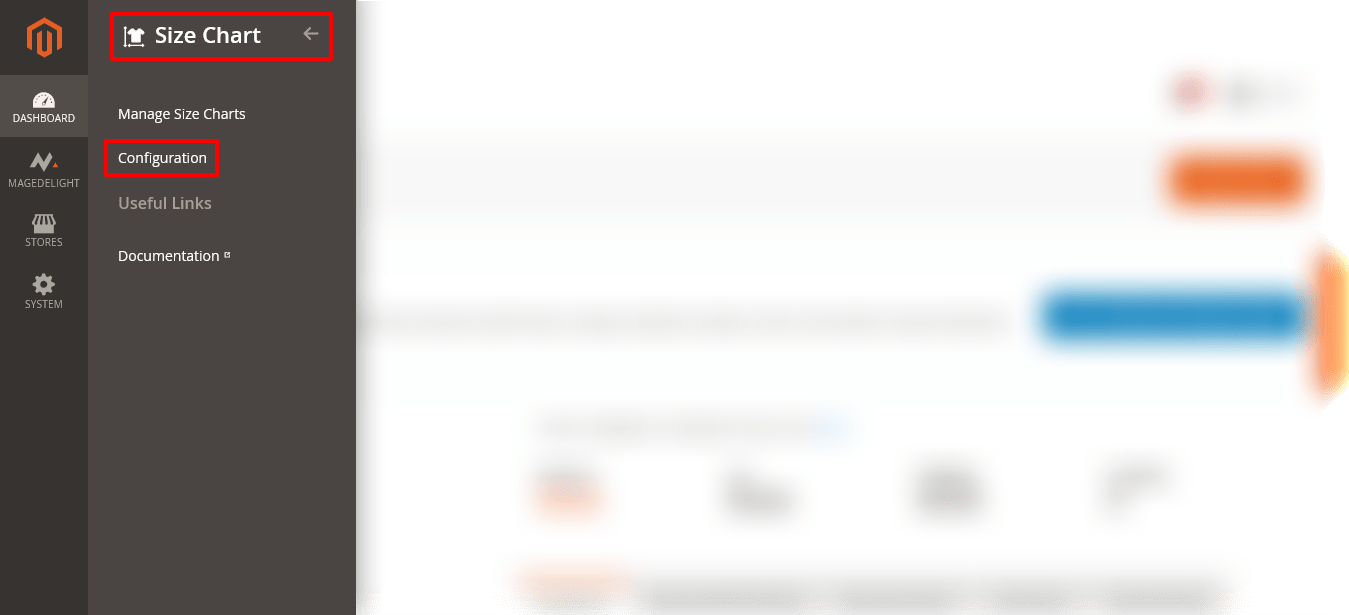
Next, go to, login to your admin panel and navigate to Stores > Size Chart > Manage Size Charts.

After that, click on the Add New Sizechart button from the top-right corner.

Next, click on the Size Chart Information section and do the following:

- Name: A descriptive internal name, such as "Women's Tops" or "Men's Bottoms." Customers do not see this name; it is for admin identification only.
- Status: Select "Enabled" to make the chart active. You can leave this as "Disabled" while building the chart and enable it once the content is ready.
- Display: Choose how the chart appears on the frontend. "Popup" shows the chart in an overlay window when the customer clicks the size chart button. "Tab" adds the chart as a product tab alongside Description and Reviews. "On Page" renders the chart as an inline section on the product page. For most apparel stores, Popup is the most practical option as it does not disrupt the product page layout.
- Priority: Sets the order of precedence when multiple size charts are assigned to the same product. Lower numbers take priority, so a chart with Priority 0 will display over a chart with Priority 5.
- Store View: Select which store views should display this chart. This is relevant if you run multiple storefronts.
- Description: An optional internal note about the chart.
Lastly, click on the Save Item button from the top-right corner to finish the process.
Step 3. Set Display Rules for the Size Chart
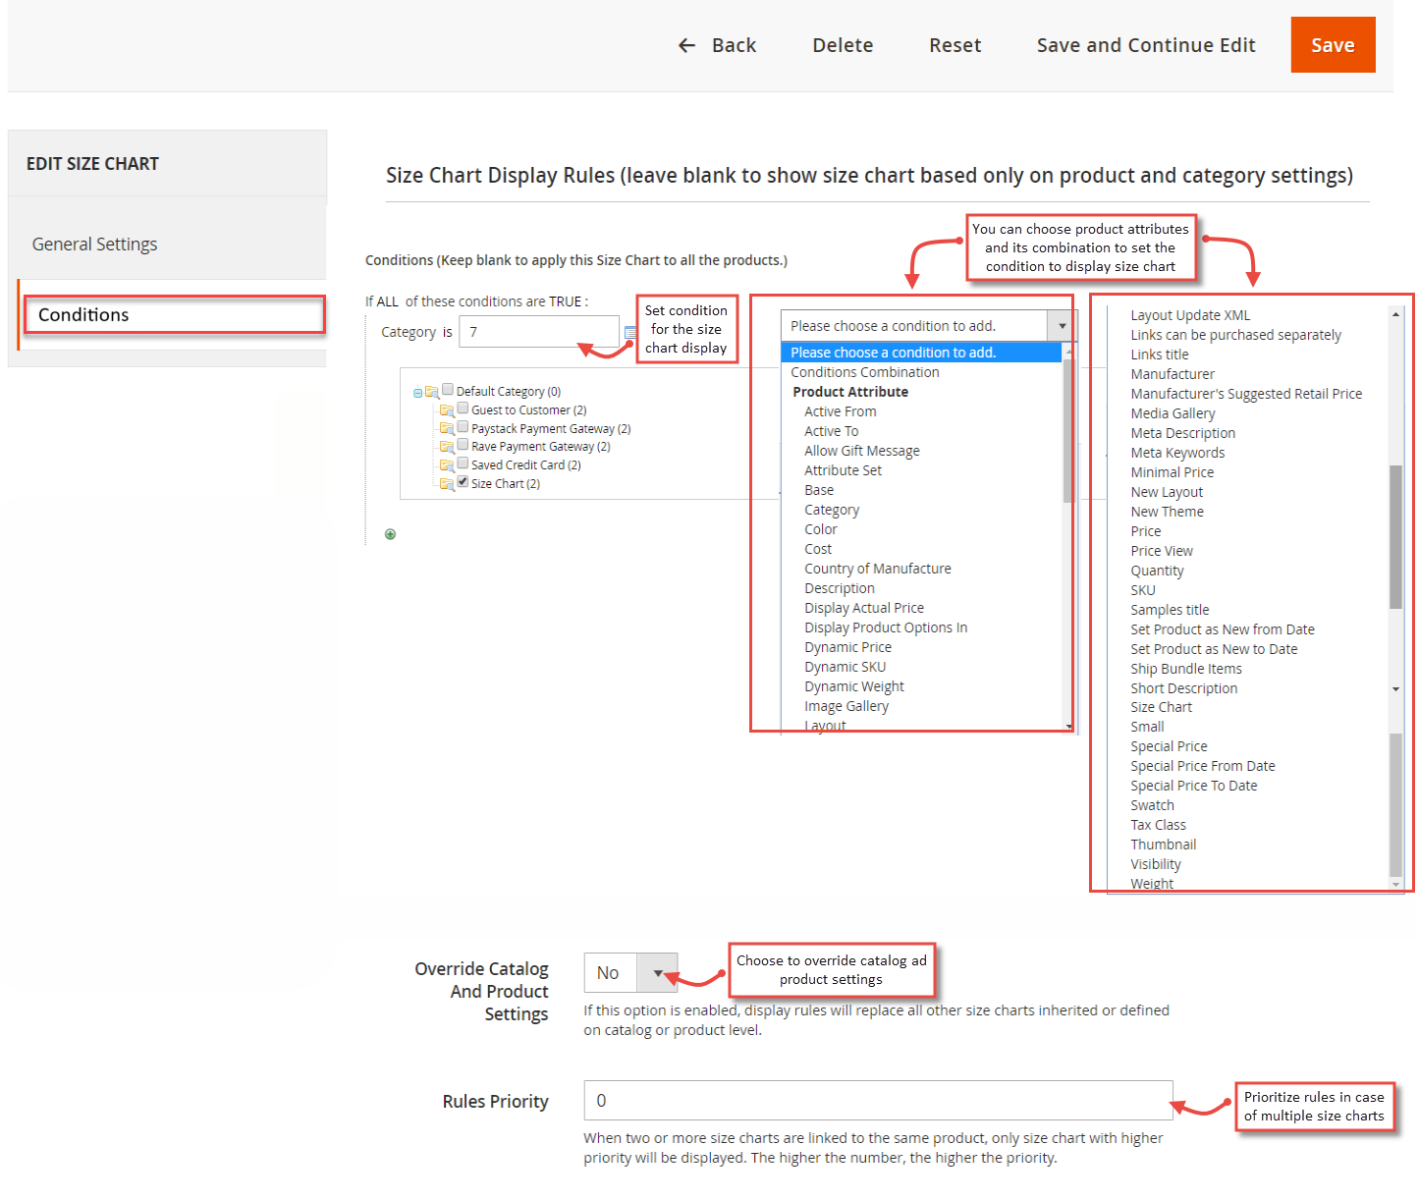
Once your chart is created, go to the Conditions tab to define when and where it should appear.
You can create conditional rules based on product attributes such as:
- Category
- SKU
- Brand
- Attribute Set
Two important settings control how these rules interact with other chart assignments:
- Override Catalog and Product Settings: Set this to "Yes" if you want the condition-based rules to take priority over size charts already assigned directly to specific products or categories. Set it to "No" if you want product-level assignments to take precedence over the rules.
- Rules Priority: Enter a numeric priority if you have multiple rule sets. Lower numbers execute first.
Understanding the priority logic matters in practice. Consider a store selling men's and women's clothing. If you create one rule assigning a "Women's Tops" chart to the Women's Tops category, and another rule assigning a "General Apparel" chart to all products, both rules will match products in the Women's Tops category. The chart with the lower Rules Priority number wins. If you have also assigned a size chart directly to a specific product, the Override setting controls whether that product-level chart or the rule-based chart takes precedence.
Click Save to apply your display conditions.
Step 4. Assign the Size Chart to Specific Products
In addition to rule-based display, you can assign size charts directly to individual products. This is the better approach when a specific product needs a unique chart that differs from the rest of its category.
If you want to assign size charts manually to products, follow these steps:
- Go to Catalog > Products and open the product you want to update.
- Scroll down to the Size Chart section within the product edit view.
- Select the applicable size chart from the dropdown of charts you have already created.
- Click Save to apply the change.

One practical note on the choice between rules and direct assignment: if you sell hundreds of products in a single category, display rules are far more efficient because a single rule covers the entire category automatically. If you have a handful of products with unique fit dimensions, direct product-level assignment gives you exact control without creating a rule for each edge case. The two approaches can be used together, with the Override setting determining which one wins when both apply to the same product.
Step 5. Add Chart Content Using the WYSIWYG Editor
Whether you arrived at the WYSIWYG editor from a new chart or an existing template, this is where the actual size data lives. The editor supports tables, text formatting, images, and HTML. A standard clothing size chart uses a table with size labels (XS, S, M, L, XL, XXL) across the top row and measurement types (chest, waist, hips, inseam) down the left column, with the corresponding measurements in each cell.
For accuracy, list measurements in both centimeters and inches wherever possible. Shoppers in different countries use different systems, and a chart that forces a UK-based customer to convert from inches adds friction that a second measurement column eliminates.
If you copied content from one of the existing template charts visible in the Manage Size Charts grid, paste it into the editor and adjust the values and styling to match your brand. Click Save Item when the content is complete.
Step 6. Verify Size Chart Display on the Frontend
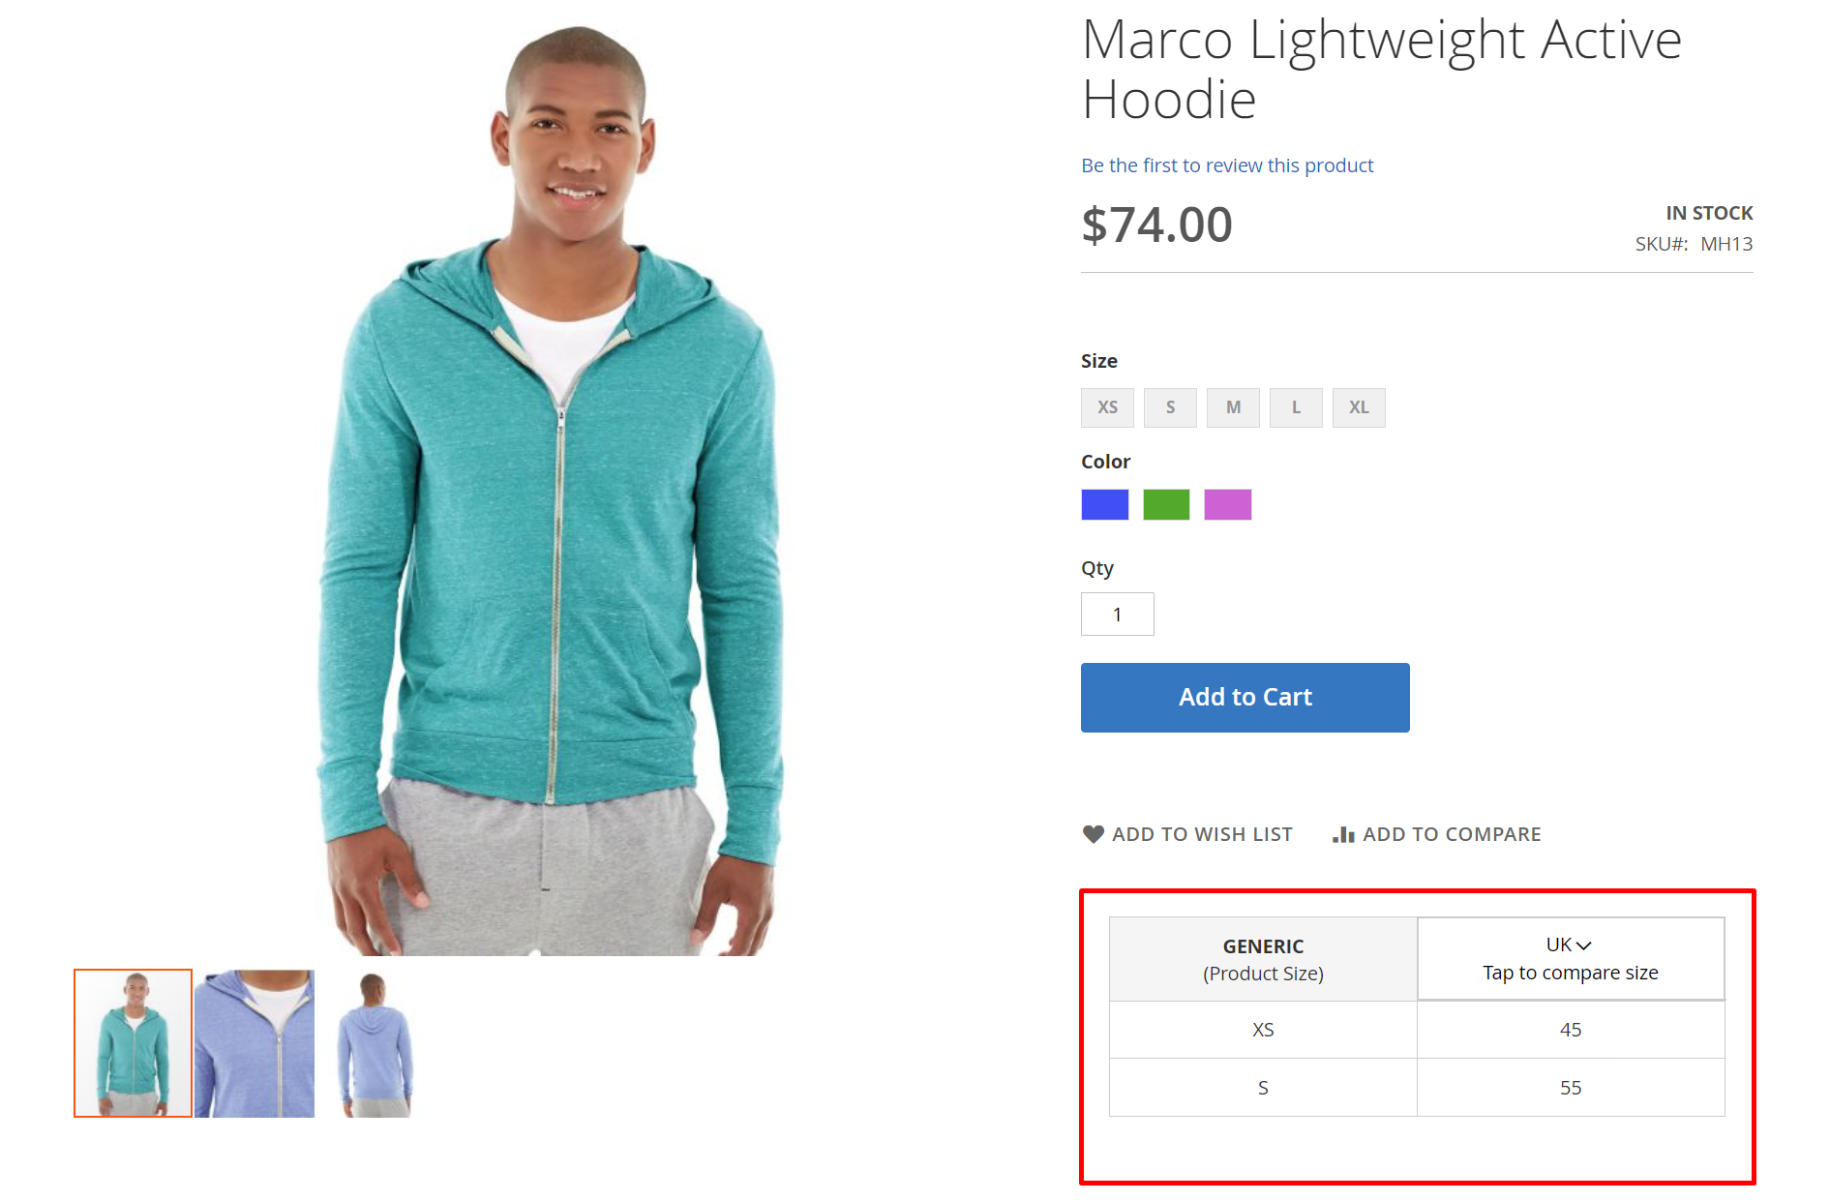
Once the configuration, rules, and chart content are saved, visit your store's frontend and open a product page that should have a size chart assigned to it.
Depending on your display settings, the size chart will appear in one of the following ways:
- Popup view: A "Size Chart" button appears on the product page near the size selector. Clicking it opens an overlay window displaying the chart without taking the customer away from the product page.
- Tab view: The chart appears as a named tab in the product information tabs section, alongside Description, Reviews, and any other tabs. The customer clicks the tab to expand the chart.
- On Page view: The chart is rendered directly on the product page as an inline section, visible without any click required.
When customers click the button, your custom size chart will appear, helping them confidently pick the right size.
If the size chart does not appear for the expected product, check that the product meets the conditions defined in Step 3, that the chart Status is set to Enabled, and that the cache has been cleared after saving. Navigate to System > Cache Management and flush the Magento cache if needed.
Best Practices for Size Charts in Magento 2
Setting up the extension is the mechanical part. Whether the charts actually reduce your return rate depends on the quality and relevance of the content inside them. These four practices make the difference between a size chart that customers trust and one they ignore.
Include Measurement Instructions, Not Just Numbers
A table showing "M = 38-40 inches" is only useful if the customer knows how to measure their chest correctly. Many shoppers, particularly those buying apparel online for the first time, measure incorrectly and still end up with the wrong size. Add a brief note explaining where to place the tape measure for each body part. For chest, that means measuring around the fullest part with the tape parallel to the floor. For inseam, measuring from the crotch to the floor.
This does not need to be a long explanation. Three or four lines of measurement guidance above or below the table is enough to improve accuracy and reduce the chance of a mismatch.
Keep Size Data Current
Sizing standards shift over time, and your product line changes more often than your size charts likely do. A chart built for last season's supplier may be inaccurate for this season's stock if the manufacturer changed the cut. Out-of-date charts cause the same problem you built them to solve: the wrong size arrives, and the customer returns it.
Build a review cadence into your product update process. When you onboard a new supplier, update the relevant size charts at the same time. MageDelight's extension makes this quick; the chart content lives in the WYSIWYG editor and can be updated without any code change.
Use Separate Charts for Different Product Types
One chart cannot serve men's tops, women's bottoms, and footwear at the same time. Each product type has different measurement points, and a chart that tries to cover everything ends up covering nothing well. Use the display rule conditions to assign category-specific charts so each product page shows only the measurement guide that is actually relevant to that product.
A practical starting set for an apparel store: separate charts for men's tops, men's bottoms, women's tops, women's bottoms, and footwear. If you carry children's clothing or accessories, add those as separate charts too. The extension supports as many charts as you need, and the condition logic means each product shows exactly one relevant chart.
Account for International Sizing Differences
If your store sells globally, a US size 8 in women's clothing is a UK size 12 and a European size 38. A customer in Germany or the UK who sees a US size label with no conversion reference has to guess or search externally, and many will simply not buy. Either build a multi-region column into the chart (US, UK, EU, AU columns side by side) or add a size conversion table as a secondary section below the main chart.
MageDelight's display conditions support store view targeting, which means you can show a UK-specific chart to visitors on your UK storefront and a US chart to visitors on your US storefront, rather than combining everything into a single crowded table. This is the cleaner option if you already run separate store views by region.
Frequently Asked Questions
Here are the common questions and it's answer you might have.
1. Does Magento 2 Have a Built-in Size Chart Feature?
No. Magento 2 does not include size chart functionality natively. You need a third-party extension, such as the MageDelight Size Chart Extension, to display size guides on product pages.
2. Can I Assign Different Size Charts to Different Product Categories?
Yes. Using the Conditions tab within the size chart editor, you can target charts to specific categories, attribute sets, SKUs, or brands. One chart can be assigned to Women's Tops, another to Men's Bottoms, and so on.
3. What Happens When a Product Has Both a Display Rule and a Direct Product Assignment?
The "Override Catalog and Product Settings" option in your Display Rules controls this. Setting it to Yes means the rule-based chart wins. Setting it to No preserves the product-level direct assignment. If you are seeing unexpected size charts on specific products, this setting is the first place to check.
4. Can I Show Size Charts as a Popup, a Tab, and Inline on the Same Store?
Yes, but each individual chart can only be set to one display mode. You can create different charts with different display modes and assign them to different products or categories, so some products use popup and others use the tab view.
5. Does the Magedelight Size Chart Extension Work With the Hyva Theme?
MageDelight offers a broad range of Hyva-compatible extensions. Check the extension product page or contact the MageDelight support team to confirm the current compatibility status for your specific Magento and Hyva version.
Final Note
That covers the complete process for adding a size chart in Magento 2 using the MageDelight Size Chart Extension. The steps above go from first installation through to a working frontend display, with the display rules and priority logic explained in enough detail to handle the edge cases that trip up most implementations.
For stores running a large catalog with consistent category-level sizing, rule-based display is the faster route. Set one rule per category and the extension handles assignment automatically as you add new products. For boutique stores where each product or brand has a unique fit, direct per-product assignment gives you precise control without maintaining complex rule sets.
By configuring this correctly, you can help customers find the right size on their first visit, reduce return rates driven by sizing errors, and improve the overall shopping experience. All of which translates directly into fewer refund requests and better margins. If you need help with the setup or want the extension configured by a Magento professional, contact the MageDelight team, and we will walk you through it.
Contact our Magento experts — we’ll help you configure and design the perfect size chart for your store in no time.