


Nearly 70% of online shopping carts are abandoned before purchase, and a complicated checkout process is one of the top reasons why. For Magento 2 store owners, the One Step Checkout extension collapses the default multi-step process into a single, streamlined page, removing the friction that pushes shoppers away right before they convert.
This guide walks you through every configuration panel in the MageDelight Magento 2 One Step Checkout Extension: from General Configuration and Display settings to Delivery Date, Custom Fields, Step Configuration, and more. Each setting is explained so you know not just where to click, but why it matters.
Prerequisites Before You Begin
Before diving into configuration, confirm the following are in place:
- Magento 2.4.x installed (the extension supports up to 2.4.8 with PHP 8.4)
- MageDelight One Step Checkout Extension installed and enabled via Composer or manual upload
- Admin access to your Magento backend (System > Admin)
- Cache cleared after installation: System > Cache Management > Flush Magento Cache
Note: Free professional installation is included with every MageDelight license. If you prefer a hands-off setup, reach out via the contact page before starting
How to Configure Magento 2 One Step Checkout?
Log in to your Magento Admin. Navigate to Stores > Configuration. In the left sidebar, look for the One Step Checkout section. You will see all configuration panels grouped below it. The admin panel is organized into these sections:
- General Configuration
- Display Configuration
- Display Style
- Delivery Date
- Extra Fee
- Default Shipping and Payment Method
- Gift Message
- Step Configuration
- Shipping Fields
- Billing Fields
- User Guide
Work through each section in order. Remember to click Save Config after making changes in each panel, then flush the cache if results do not appear on the frontend immediately.
Step 1. Access General Configuration
Navigate to Stores > Configuration > One Step Checkout > General Configuration. This is the master control panel. The extension will not activate until Enable One Step Checkout is set to Yes here.

- Enable One Step Checkout → Yes. Activates the extension; set to No only to temporarily disable without uninstalling
- Checkout Title → "Secure Checkout". Short, reassuring heading shown at the top of the checkout page
- Checkout Menu Title → "Checkout". Label shown in the browser tab/breadcrumb
- Checkout Description → "Free returns · Ships in 1–2 days". One line of trust-building copy below the title; leave blank if you have nothing meaningful to say
- Add Product for Checkout → No. Adds an upsell product widget; only enable if you intentionally want to cross-sell on the checkout page
- Enable auto-suggest address by Google → Yes. Requires a Google Maps Places API key; dramatically reduces address typos and speeds up form fill
- Redirect to checkout page on Add to Cart → No. Keep No for multi-product stores; set Yes only for single-product or high-intent landing pages
- Customer Registration on Checkout → Yes. Let's guest shoppers optionally create an account after placing the order; far less friction than forcing registration before purchase
Note: The 'Enable auto-suggest address by Google' setting requires a Google Maps JavaScript API key with Places API enabled. Without it, the field will show no autocomplete suggestions even when set to Yes.
Step 2. Customize Display Settings
Navigate to Stores > Configuration > One Step Checkout > Display Configuration. This panel controls which elements are visible on the checkout page. Every field you show is a potential friction point, so only enable what your store actually needs.

- Display Header → Yes. Keeps branding visible and reassures shoppers they are still on your store
- Display Footer → No. Remove footer navigation links to eliminate distractions that pull shoppers away from completing the order
- Display CMS Block Comments → Yes. Enable only if you have a CMS block with useful content (trust badges, security icons); leave No otherwise
- Display Newsletter → No. Optional subscribe checkbox; only enable if list growth is a priority and you have tested it does not hurt conversions
- Default Newsletter Checked → No. Never pre-check this; opt-in must be a conscious choice (GDPR/CAN-SPAM compliance)
- Display Coupon Code → Yes. Always show; shoppers who have a code will abandon if they cannot find the field
- Display Product Image → Yes. Showing product thumbnails in the order summary reinforces confidence in what is being purchased
- Display Agreements → Yes (if you have checkout terms). Required for legal compliance in many regions; leave No if you have no configured agreements
- Display CMS Block (Top of Checkout Page) → Optional. Use for time-sensitive promotions, free shipping thresholds, or a security badge banner
- Display CMS Block (Bottom of Checkout Page) → Optional. Good placement for return policy summary or support contact
- Display CMS Block (Removal of Thank You Page) → Optional. Use the order success page for post-purchase upsells or loyalty program sign-up prompts
Note: The 'Display Header' and 'Display Footer' settings significantly affect checkout conversion. A/B testing shows that a distraction-free checkout (header visible, footer hidden) often outperforms showing all site navigation.
Step 3. Configure Display Style
Navigate to Stores > Configuration > One Step Checkout > Display Style. This panel controls the visual appearance of the checkout page. Changes here are cosmetic and do not affect checkout logic, but they directly affect how professional and trustworthy the page feels.

- Heading Form Color → Your brand primary color. Applied to section headings (Shipping Address, Payment Method, etc.); use a hex code that matches your brand
- Description Form Color → Dark neutral (#333333). Field labels and helper text; keep high contrast for readability
- Layout Color → White or very light grey (#F8F8F8). Overall page background; a clean neutral keeps focus on the form
- Steps Box Color → Your brand accent/secondary color. Background of step indicator boxes; use a color that is clearly distinct from the form background
- Place Order Button Color → High-contrast CTA color (orange #FF6600 or green #28A745). This is your most important button; use your highest-converting color, not default blue
Note: Always test Display Style changes on both desktop and mobile before saving to production. Color contrast matters for accessibility. Aim for a minimum 4.5:1 contrast ratio between button text and button background.
Step 4. Delivery Date
Navigate to Stores > Configuration > One Step Checkout > Delivery Date. This section lets customers select a preferred delivery date and time slot at checkout. It is particularly valuable for food delivery, florists, gift stores, and any business where delivery timing matters to the customer.
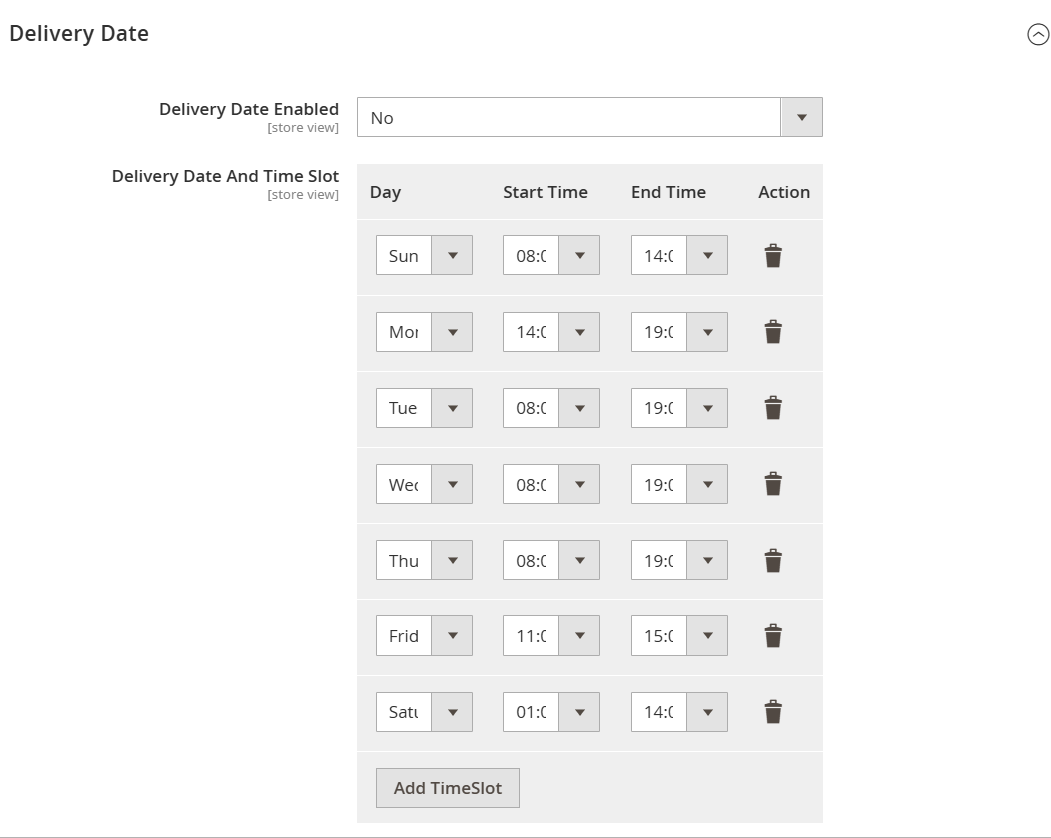
- Delivery Date Enabled → Yes (if your business honors scheduled delivery). Set No for standard ecommerce where delivery timing is handled by the carrier
- Delivery Date And Time Slot (per day grid):
- Toggle each weekday on or off using the day checkbox. Disable days you do not deliver (e.g. Sunday)
- Set Start Time and End Time for each available day. E.g. 09:00 to 17:00
- Click Add Timeslot to add multiple windows per day. E.g. Morning (9–12) and Afternoon (2–5)
- Use the trash icon to remove unwanted slots
- Recommended minimum: configure at least one slot per enabled day or the date picker will appear with no selectable times
Note: If Delivery Date is enabled but no time slots are configured, customers will see a date picker with no time options. Configure at least one time slot per enabled day to avoid a confusing checkout experience.
Step 5. Extra Fee
Navigate to Stores > Configuration > One Step Checkout > Extra Fee. Select Yes. This section allows you to add charges at checkout, such as handling, gift-wrapping, or service fees. These fees appear as a separate line item in the order total.
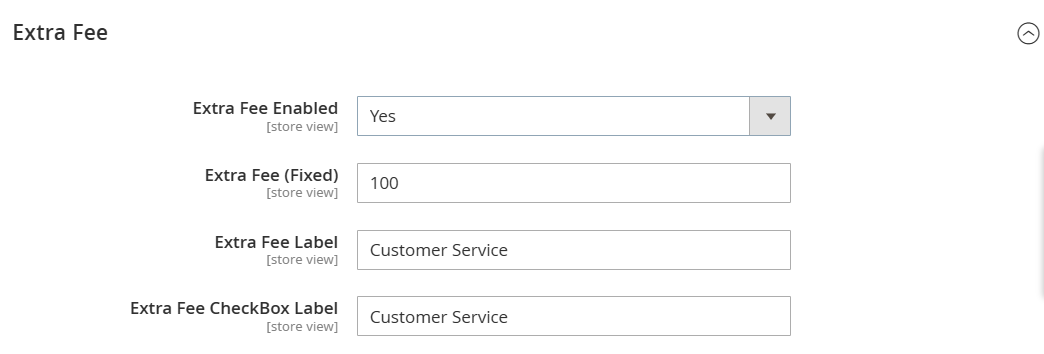
- Extra Fee Name → Descriptive label (e.g. "Gift Wrapping" or "Handling Fee"). Never use vague labels like "Extra Charge"; unexplained fees are a top cart abandonment trigger
- Fee Amount → Fixed or percentage. Keep it proportionate and clearly tied to a real service
- Apply Automatically vs. Optional Checkbox → Optional checkbox preferred. Giving customers control over optional fees (gift wrap, insurance) is better than silently adding them
Step 6. Default Shipping and Payment Method
Navigate to Stores > Configuration > One Step Checkout > Default Shipping and Payment Method.

- Default Shipping Method → Your most commonly chosen carrier/rate. Pre-selecting the most popular option (e.g. Free Shipping or Standard Delivery) removes a decision and reduces hesitation
- Default Payment Method → Your primary gateway (e.g. Stripe, Braintree, or your main card processor). Pre-selecting eliminates the step of choosing, which is especially important for mobile shoppers
Note: Pre-selecting defaults does not prevent customers from changing their choice. It simply reduces the number of decisions they need to make, which consistently improves completion rates.
Step 7. Gift Message
Navigate to Stores > Configuration > One Step Checkout > Gift Message.
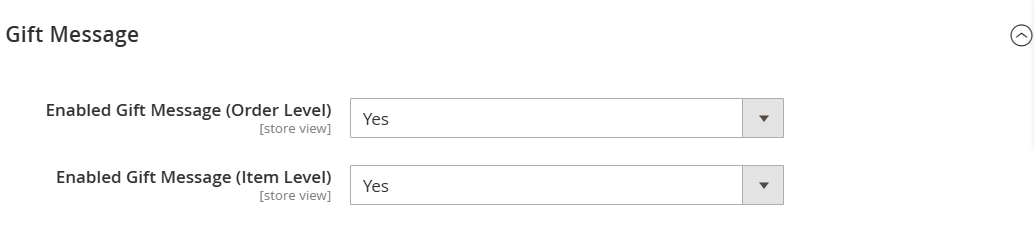
- Enabled Gift Message (Order Level) → Yes. Shows a single gift message field for the whole order; essential for gift-focused stores; low cost to enable even for general retail
- Enabled Gift Message (Item Level) → Yes (for stores selling multiple gift items). Shows a per-product message field; only needed when different items in one order may go to different recipients
Note: Gift message fields appear only when the customer expands the gift section. They do not clutter the checkout form for shoppers who do not need them.
Step 8. Step Configuration
Navigate to Stores > Configuration > One Step Checkout > Step Configuration. This is one of the most powerful panels in the extension. It controls how the checkout sections are arranged and sequenced on the page.
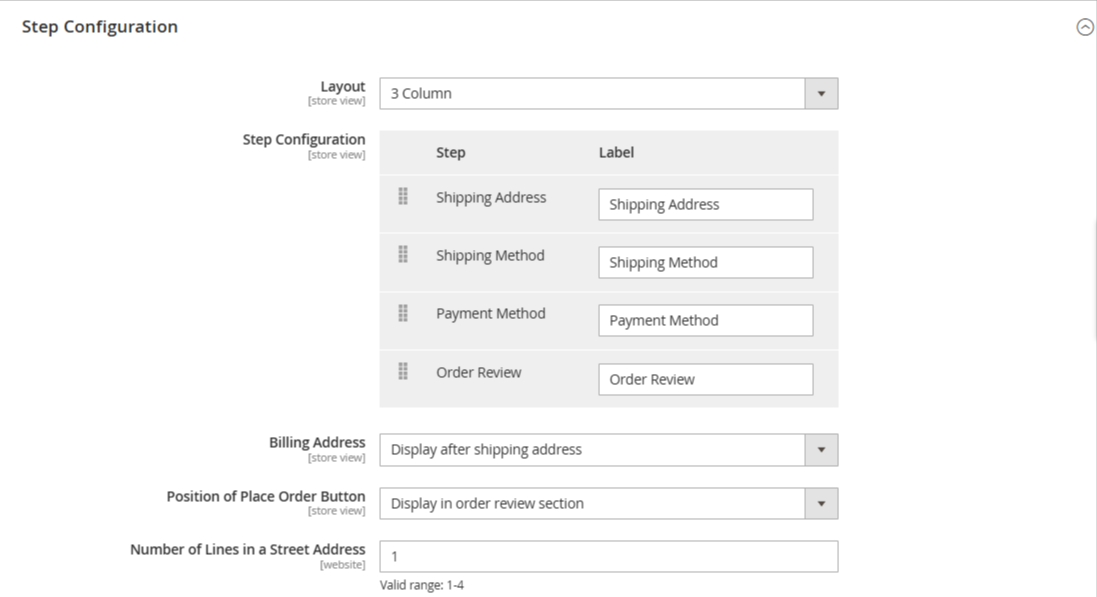
- Layout → 2 Column (desktop-heavy traffic) / 1 Column (mobile-heavy traffic). Check your Google Analytics device split; 1-column stacks cleanly on all devices and is the safer default
- Step Configuration (drag-and-drop order) → Recommended order: Shipping Address → Shipping Method → Payment → Billing Address. Put address first since it is the most natural starting point; payment last reduces drop-off anxiety
- Billing Address → Same as Shipping Address (default checked). The majority of B2C shoppers have identical billing and shipping; defaulting to Same reduces perceived form length significantly
- Position of Place Order Button → After Payment Method. Place it directly below the last thing the customer interacts with before committing; do not bury it at the bottom of the page
- Number of Lines in Street Address → 2. Two lines covers apartment/suite numbers; 1 is too limiting, 3 is unnecessary for most markets
Note: The drag-and-drop step reordering is visible in the admin panel as a grid with Step (icon), Label, and colored blocks representing each checkout stage. Drag rows up or down to reorder. Changes take effect after saving and cache flush.
Step 9. Shipping Fields
Navigate to Stores > Configuration > One Step Checkout > Shipping Fields. This panel controls exactly which fields appear in the Shipping Address form and how they are configured. You can add custom fields here, in addition to the standard Magento address fields.
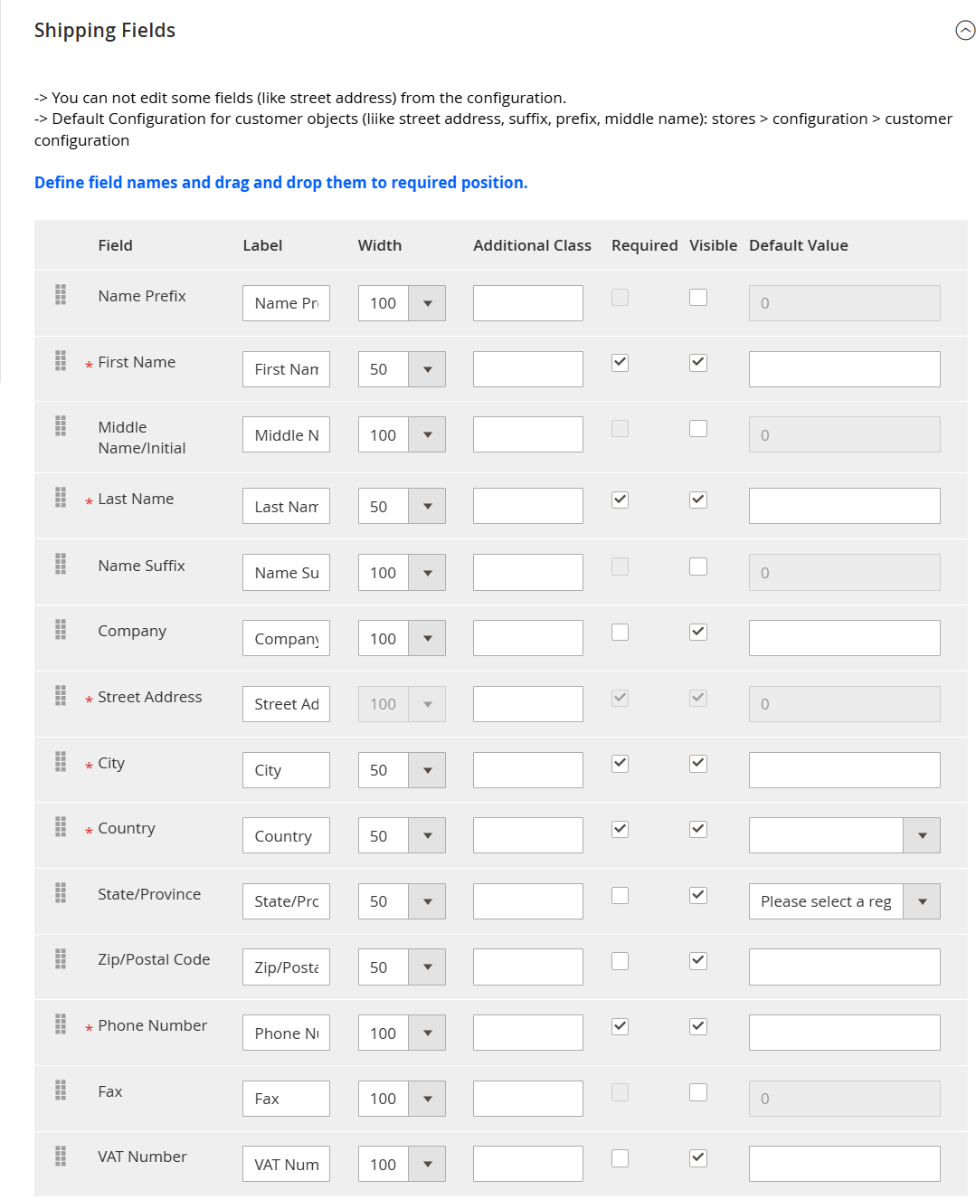
Note: To add completely custom fields (beyond the standard address fields), use the Custom Fields panel accessible from the extension documentation. The Shipping Fields panel here manages existing address attributes only.
Step 10. Billing Fields
Navigate to Stores > Configuration > One Step Checkout > Billing Fields. This panel works identically to Shipping Fields but applies to the billing address form. The same columns (Field, Label, Width, Additional Class, Required, Visible, Default Value) are available.
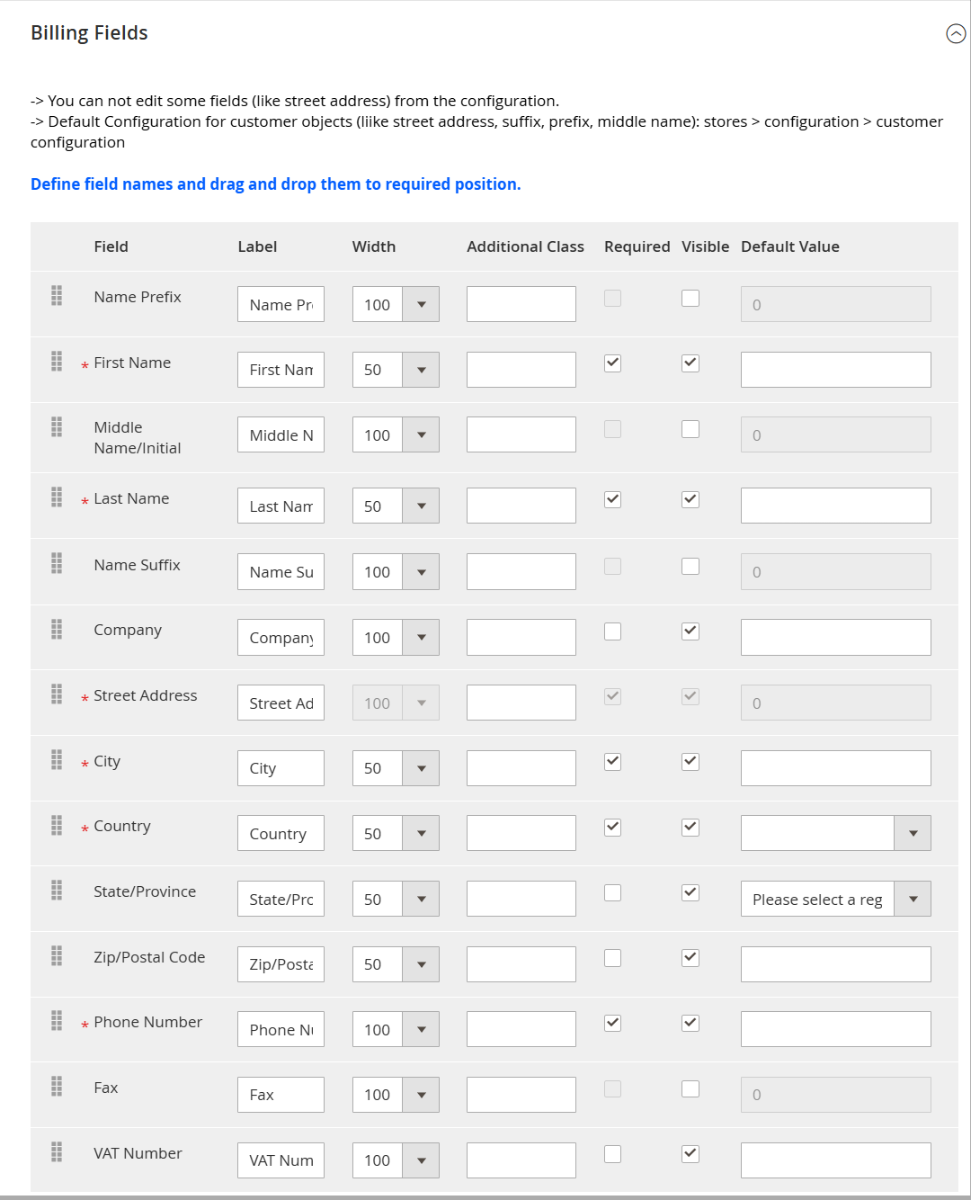
Apply the same logic as Shipping Fields. Additional guidance:
- When "Same as Shipping" is the default — most billing fields are hidden automatically; focus configuration effort on the edge case where billing differs
- Company → Visible for B2B, hidden for B2C — same rule as shipping
- VAT Number → Required for EU B2B stores — essential for tax compliance; hide entirely for consumer stores
- Country → Set a default value — same default as shipping to avoid the customer having to re-select it on the billing side
- Telephone → Optional at billing level — already captured in shipping; only require it here if your payment processor specifically needs a billing phone number
Note: Changes to Billing Fields only affect the standalone billing address form. When a customer uses 'Same as Shipping Address', the billing form is hidden and these settings have no visible effect.
Magento 2 One Step Checkout: Native vs. MageDelight Extension
Here is a direct comparison of what the built-in Magento checkout offers versus the MageDelight One Step Checkout extension:
|
Feature |
Magento 2 Native Checkout |
MageDelight One Step Checkout |
|
Checkout layout |
Multi-step (3 steps) |
Single page, one step |
|
Guest checkout |
Yes |
Yes |
|
Address autocomplete |
No |
Yes (Google Places API) |
|
Delivery date picker |
No |
Yes, with time slots |
|
Custom checkout fields |
Developer required |
Admin configurable |
|
Drag-and-drop step order |
No |
Yes |
|
Gift message (order + item) |
Limited |
Yes, both levels |
|
Default shipping/payment |
No pre-selection |
Admin-configurable defaults |
|
Hyva theme compatible |
Yes |
Yes (no extra cost) |
|
Price |
Included in Magento |
From $179 |
Common Issues and How to Fix Them
Here are the common issues and it's fixes you might face with One Step Checkout configuration.
One Step Checkout Page Not Loading or JS Errors
This is almost always a JavaScript conflict with another module. Steps to diagnose:
- Open the browser developer console (F12 > Console) and identify the specific error and file
- Temporarily disable other checkout-related extensions one at a time to isolate the conflict
- Ensure you ran the required post-install commands: php bin/magento setup:upgrade && php bin/magento setup:di:compile && php bin/magento cache:flush
- If using a custom theme, check that layout XML files are not overriding the extension's checkout blocks
Stuck on Billing Step or Continue Button Not Responding
- Check that all required fields are properly mapped in Shipping Fields and Billing Fields panels
- Verify payment method modules are compatible with your Magento version (older payment extensions commonly break single-page flows)
- Check PHP error logs at var/log/exception.log and var/log/system.log for server-side errors
- Test in an incognito browser window to rule out cached session or cookie conflicts
Shipping Method Not Showing
- Go to Stores > Configuration > Sales > Shipping Methods and confirm at least one carrier is enabled and configured
- Verify the shipping origin address is set: Stores > Configuration > Sales > Shipping Settings > Origin
- If using table rates, confirm the rate CSV is correctly uploaded and the active store view matches
Delivery Date Not Appearing on Checkout
- Confirm Delivery Date Enabled is set to Yes in the Delivery Date panel
- Verify at least one day has time slots configured in the delivery schedule grid
- Flush cache after saving: System > Cache Management > Flush Magento Cache
Frequently Asked Questions
Here are the common FAQs.
1. What is the Difference Between One Step Checkout and One Page Checkout in Magento 2?
They refer to the same concept. Both terms describe a checkout flow where all steps (shipping address, shipping method, payment, and order review) appear on a single page simultaneously. Magento's default checkout loads all steps on one URL but presents them sequentially; a one step checkout extension makes everything visible and fillable at once.
2. Does Magedelight One Step Checkout Work With Hyva Themes?
Yes. Hyva compatibility is included at no extra cost, which is worth noting since several competing extensions charge a separate license fee for Hyva support. Verify the current compatibility on the extension product page.
3. Is There a Free Magento 2 One Step Checkout Extension?
Free community extensions are available on GitHub, but they typically lack features such as address autocomplete, delivery date selection, custom fields, and dedicated compatibility updates for newer Magento versions. For production stores, a paid extension with active support is the lower-risk choice as Magento releases security patches that can break unmaintained modules.
4. How Do I Enable Guest Checkout in Magento 2 One Step Checkout?
In General Configuration (Stores > Configuration > One Step Checkout > General Configuration), set Customer Registration on Checkout to Yes. Additionally, go to Stores > Configuration > Sales > Checkout and confirm Allow Guest Checkout is also set to Yes at the Magento level.
5. Will One Step Checkout Improve My Conversion Rate?
Stores moving from Magento's default multi-step checkout to a single-page flow commonly report meaningful improvements. The MageDelight extension cites up to a 40% boost in conversion rate as a benchmark. The actual result depends on your traffic quality, device mix, and how well the display and field settings are optimized for your specific customer base.
Next Steps
Once you have configured all panels, run through this checklist before going live:
- Test the full checkout flow as a guest and as a logged-in customer
- Test on desktop and mobile (use Chrome DevTools device emulation if needed)
- Place a real test order using a payment sandbox or test card
- Confirm the order confirmation email triggers correctly
- Verify the delivery date selection (if enabled) appears and saves to the order
- Check that custom fields data saves to the order and appears in the admin order view
To explore the extension in action before committing, MageDelight provides live frontend and backend demos. For additional questions, the One Step Checkout FAQ page covers the most common scenarios. If you encounter issues, reach the support team here.
For broader checkout optimization strategies, see: Tips to Streamline the Magento Checkout Experience and Maximize Conversions.