
 (2 votes, average: 5.00 out of 5)
A safe and secured payment gateway is a key element in an eCommerce store. Customers need to feel safety about the details they provide on the store. A seamless experience is not enough in the advanced world full of cyber criminals.
If your store is built on Magento 2, half of your work is done. Magento offers enhanced security by default. Additionally, there are several payment gateways to help store owners ease the process. To integrate those payment gateways, there are hundreds of payment gateway Magento 2 extensions built by industry leaders.
Our Magento 2 Moneris Payment Gateway is one such extension that will help you integrate Moneris Payment Gateway to the eCommerce store seamlessly.
In this article, we will help you with a step by step guide to configure and install Moneris Payment Gateway Magento 2 Extension to your store.
Installation
- Unzip the extension package file into the root folder of your Magento 2 installation.
- Connect to SSH console of your server:
- Navigate to the root folder of your Magento 2 setup
- Run command as per below sequence,php -f bin/magento setup:upgradephp -f bin/magento module:enable Magedelight_Moneris
php -f bin/magento setup:static-content:deploy
- Flush store cache
- log out from the backend and log in again
Backend Configuration
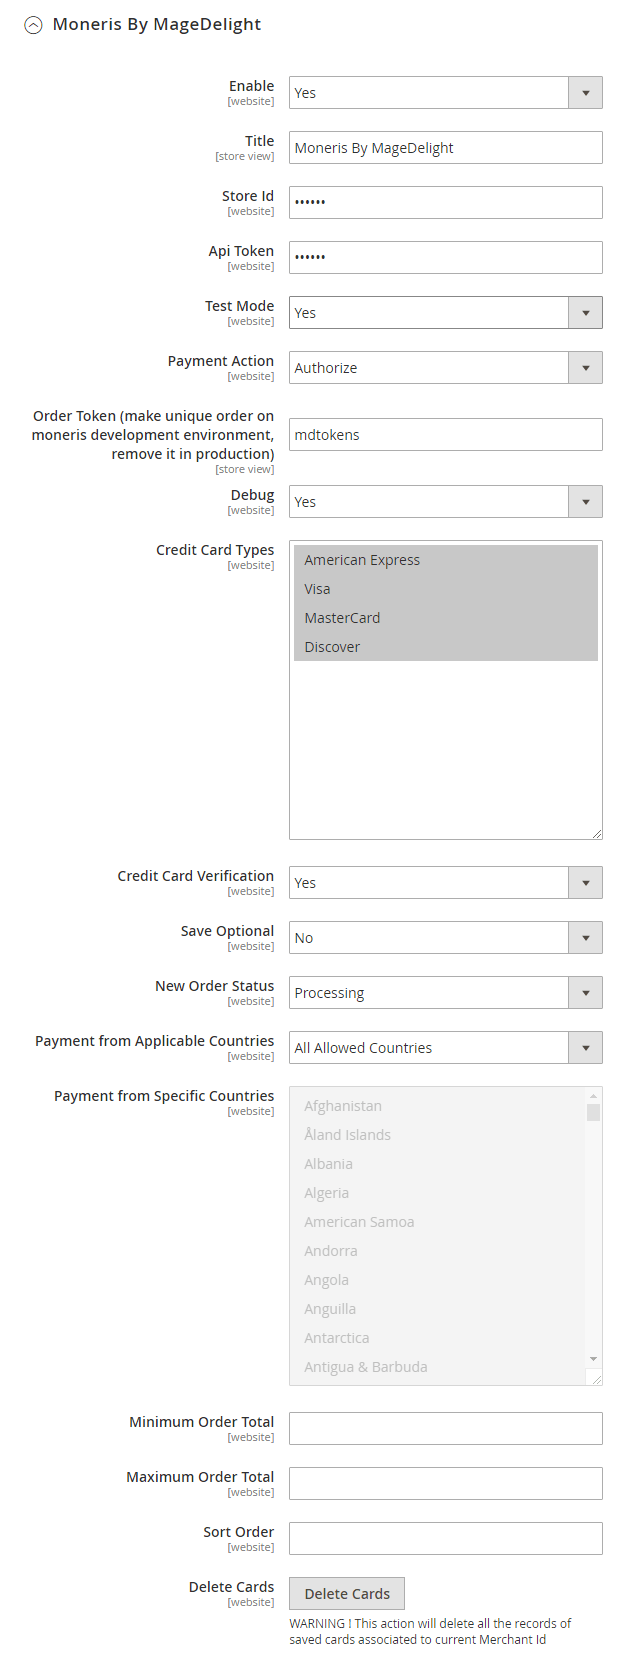
- Enabled: This can enable/disable the Moneris Payment method.
- Title: Here you can define the label for Moneris Payment method that will display in
- Payment section of one page checkout.
- Payment information of order, invoice, credit memo and shipment section.
- Store ID: Unique identifier provided by Moneris upon merchant account set up.
- API Token: Unique alphanumeric string assigned upon merchant account activation.
- Test Mode: Admin can define the mode of Moneris Payment method of web shop. Merchant can set either “Yes”/ “No” for this option depends on the environment of web shop (Production or Development).
- Payment Action: Admin can define the payment action that would take on successful order placed by user. Admin can choose,
- Authorize and Capture: This payment action will directly capture the requested amount from the customer credit card on placing an order from frontend or backend. Invoice will be automatically created when user successfully places an order.
- Authorize Only: This payment action will only authorize the requested amount on the credit card of customer on placing an order from frontend or backend.
- Order Token (make unique order on Moneris development environment, remove it in production): This field is used only while testing on extension Demo (will not be useful for Live Environment). This would append the text written in this field to the Order ID generated on Merchant server during the transactions and Moneris stores all the details of the orders on its own server and provide an open testing account (with id and password) to view the orders made from demo website (This is common account for all Moneris payment gateway extension providers). Hence to recognize our Order IDs we added this field which appends the text to each Order ID and it helps recognizing them in the common list of Moneris server.
- Debug: This option defines the debugging mode of Moneris payment method. Admin can choose “Yes / No” depending on the Production / Development environment if web site. Normally this option should only enabled for development environment.
- Credit Card Types: This option defines the list of Credit Cards that customer can choose from card selection field on payment section of one page checkout page.
- Credit Card Verification: This field will allow admin to select whether Card Code Verification option should be display or not on payment section.
- Save Optional: The customer must have to save the credit card for future transaction processing if this field it set to “No”. By selecting “Yes” for this field will allow customers to choose whether they want to save the credit card for future processing or not.
- New Order Status: This option defined the order status after successful processing the order.
- Payment from Applicable Countries
- This option allow admin to configure Moneris Payment gateway for specific countries,
- By selecting “All Allowed Countries” from this option will make Moneris Payment for customers from all the countries.
- By selecting “Specific Countries” from this option will make Moneris Payment method for customers from specific countries.
- This option allow admin to configure Moneris Payment gateway for specific countries,
- Payment from Specific Countries: This option will be only enabled if “Payment from Applicable Countries” option will set to “Specific Countries”.
This option will be multi select option so admin can choose one or more countries from this fields for which this payment method will be display on payment section. - Minimum Order Total: This option defines the minimum order total for which this payment method display on payment section of one-page checkout on frontend.
- Maximum Order Total: This option defines the maximum order total for which this payment method will display on payment section of one-page checkout page of frontend.
-
Sort Order: This option defined the sort order of payment method on the payment step on checkout one page of frontend.
And it’s done.
Now offer a seamless and secure shopping experience with Moneris Payment Gateway. Hope this has been a helpful tutorial, still if you face any issues while installation, feel free to reach us out.
