

 (4 votes, average: 4.00 out of 5)
Owning an eCommerce store and looking to offer a secure and safe payment experience? Well, the first step would be to find out the most appropriate and safe payment gateway. Store owners can integrate this payment gateway and improve the customer experience along with enhanced payment experience on the eCommerce store. In today’s article, we will help you configure one such amazing payment gateway extension to your Magento 2 store.
Payeezy, powered by First Data, is a payment gateway that supports merchants from 50+ countries and accepts payments in 140+ currencies. With the First Data Payment Magento 2 Extension, the entire process of making payments becomes pretty fast and simple for customers. Customer can save their credit card details on secured servers of First Data and use this information at the time of checkout for faster payment as they don’t need to provide their card details every time they shop from the e-store.
Let us have a look at the step-by-step process to help you with the installation and configuration process of Magento 2 First Data Payment Gateway Extension.
- Installation:
- Download the MageDelight base extension.
- Unzip the extension package into the Magento 2 root folder.
- Connect to SSH console and run setup commands.
- Backend Configuration:
- Enable/disable the First Data Payment method.
- Define title, Gateway ID, Gateway Password, Key ID, HMAC Key, and other configurations.
- Set payment action, gateway URLs, debug mode, credit card types, and verification options.
- Configure optional settings, order status, applicable countries, and order total limits.
- Backend Functionality for the Admin:
- Manage customer cards from the customer management section.
- View, add, edit, or delete saved cards.
- Access payment information for specific orders, including card type, masked card number, transaction details, and more.
Installation:
First of all, download the MageDelight base extension here. – https://www.magedelight.com/pub/extensions/magedelight-base.zip
After this,
- Unzip the extension package file into the root folder of your Magento 2 installation.
- Connect to SSH console of your server:
- Navigate to the root folder of your Magento 2 setup
- Run command as per below sequence,
php bin/magento setup:upgrade
php bin/magento setup:di:compile
php bin/magento setup:static-content:deploy
php bin/magento cache:clean
- log out from the backend and log in again
Backend Configuration
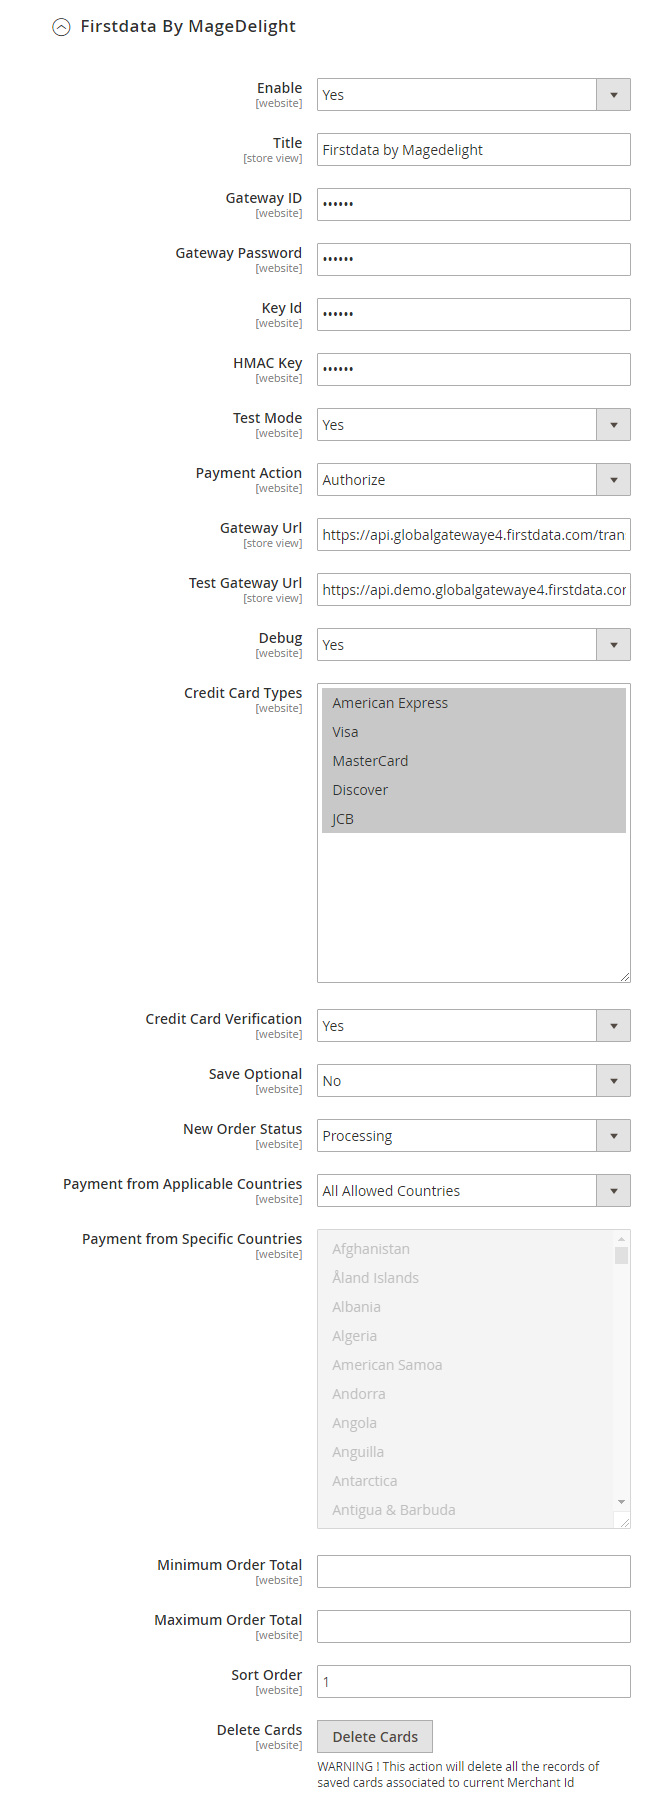
- Enable: Enable/disable the First Data Payment method.
- Title: Define the label for First Data Payment method that will display in the payment section checkout page. Payment information of order, invoice, credit memo and shipment section will be included.
- Gateway ID: This ID identifies the merchant within the First Data and is also used to log in to the First Data Business Center.
- Gateway Password: Merchant can define gateway password that is associated with current First Data merchant account.
- Key ID: Admin will be allowed to get the key ID for First Data transaction key ID from merchant account.
- HMAC Key: Configure merchant key ID here.
- Test Mode: Admin can define the mode of First Data Payment method of web shop. Merchant can set either “Yes”/ “No” for this option depends on the environment of web shop (Production or Development).
- Payment Action: Admin can define the payment action that would take on successful order placed by user. Admin can choose,
- Authorize and Capture: This payment action will directly capture the requested amount from the customer credit card on placing an order from frontend or backend. Invoice will automatically create when user successfully place an order.
- Authorize Only: This payment action will only authorize the requested amount on the credit card of customer on placing an order from frontend or backend.
- Gateway URL: This option defines the Gateway URL for live mode of First Data payment method API.
https://api.globalgatewaye4.firstdata.com/transaction/v19/wsdl - Test Gateway URL: This option defines the Gateway URL for test mode of First Data payment method API.
https://api.demo.globalgatewaye4.firstdata.com/transaction/v19/wsdl - Debug: This option defines the debugging mode of First Data payment method. Admin can choose “Yes / No” depending on the Production / Development environment if web site. Normally this option should only be enabled for a development environment.
- Credit Card Types: This option defines the list of Credit Cards that customers can choose from the card selection field on the payment section of one page checkout page.
- Credit Card Verification: This field will allow the admin to select whether the Card Code Verification option should be displayed or not on payment section.
- Save Optional: The customer must have to save the credit card for future transaction processing if this field it set to “No”. By selecting “Yes” for this field will allow customers to choose whether they want to save the credit card for future processing or not.
- New Order Status: This option defined the order status after successfully processing the order.
- Payment from Applicable Countries: This option allows admin to configure First Data Payment gateway for specific countries,
- By selecting “All Allowed Countries” from this option will make First Data Payment for customers from all the countries.
- By selecting “Specific Countries” from this option will make First Data Payment method for customers from specific countries.
- Payment from Specific Countries: This option will only enabled if “Payment from Applicable Countries” option will set to “Specific Countries”.
This option will be a multi-select option so the admin can choose one or more countries from these fields for which this payment method will be displayed on the payment section. - Minimum Order Total: This option defines the minimum order total for which this payment method displays on the payment section of one-page checkout on the front end.
- Maximum Order Total: This option defines the maximum order total for which this payment method will display on the payment section of the one-page checkout page of the frontend.
- Sort Order: This option defined the sort order of payment method on the payment step on checkout one page of the frontend.
- Delete Cards: Admin can edit the merchant details (though it is not a good practice to change). On edit, it is required to delete the saved credit cards manually
Backend Functionality for the Admin
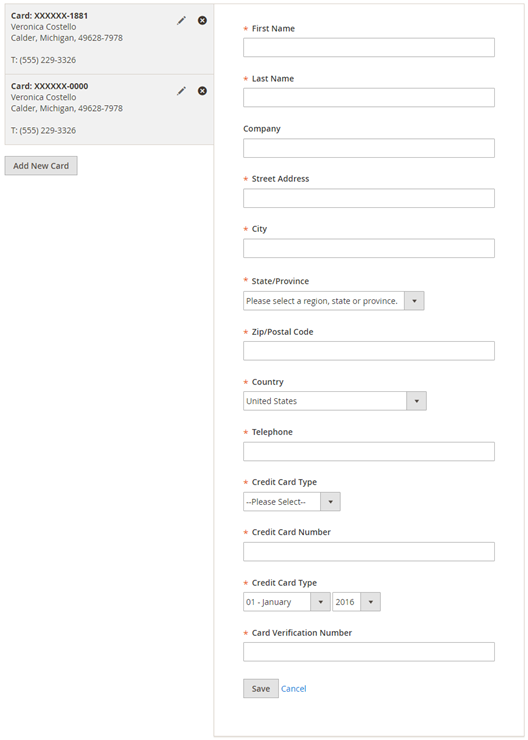
Admin is facilitated to manage customer cards from customer management section of backend interface. In customer edit section admin can go to the “First Data (Saved Cards)” tab. Here admin can able to view all stored cards for each customer, also can add new card as well as edit or delete particular card.
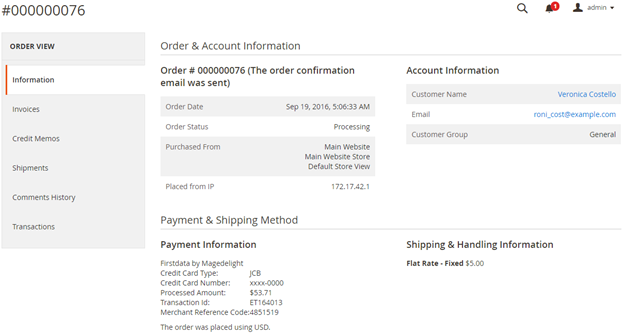
Admin is allowed to see the payment information for specific order like “Credit Card Type”, Credit card number with masked format, total processed amount on the card, First Data gateway generated transaction id, AVS Response, CVN Response, Merchant Reference code and the currency format in which order was placed.
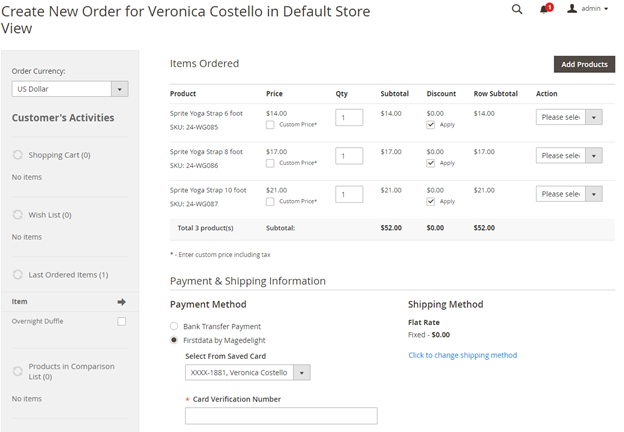
First Data payment gateway extension by MageDelight would allow admin to place an order on behalf of the customer using saved order. It simply means the admin would not need to contact customer for payment information.
Conclusion
There you go!
This is the easiest way to integrate First Data Payment Gateway to your Magento 2 store with MageDelight Magento 2 First Data Payment Module Extension.
Also, you can refer this Magento 2 First Data Payment Extension’s FAQ Page for most common questions and it’s answers.
We hope that you found this tutorial helpful. If you have any questions, please ask them in the comments below.
And if you need our professional assistance, feel free to contact us at any time.

